Digital Portfolio

This blog is my digital portfolio for EDIM 514, my learning throughout my Wilkes Master’s Degree program in Instructional Media, my presence online, and some about my teaching. I decided to choose this WordPress blog because I already had worked on improving it throughout four classes, so I only needed to add information on six other classes and my personal information.

While this portfolio is missing almost all of my discussion posts, it does include all or almost all of the main assignments I completed to earn my Master’s Degree over the past few years, and thus is a great indication of my thoughts on education and use of online and technological resources throughout this process. I uploaded all of my word docs to Googledrive, so anyone visiting the portfolio would easily click and see information without needing to download anything. The video assignments are also linked to Googledrive, and any other assignments are linked to their original location.

album-antique-arrangement-699782
Image from Pexels.com

I decided to add all of my social media contact information for ones where I have posts or I frequent regularly, even if they are not specific to teaching, because it gives a better overview of my digital dossier and my online personality. While I do not often use Linkedin, it is a good professional source to include. I use YouTube for my classroom videos, so I linked that account as well as a curation board from Pinterest with some teaching resources. Twitter I linked because I have an account and have used it a little bit, but may use it more in the future. I linked my personal Instagram and Facebook, which I use most often, to provide a broader view of my online presence and efforts. I also wanted to provide my email as contact information but not my phone number because this blog is public, and I am unwilling to publicly give my private number out. I linked my old teaching portfolio from when I was trying to get and job and then updated after I got my first job to show some of my internet collection efforts from five years ago. The about me section helps give initial information, and then all of the other links and tabs to assignments from previous classes fills in the gaps about my studies, interests, passions, and personality. All of this shows that I love using technology, trying new resources, and in particular teaching English.

Live Webinar on Digital Literacy

Finding a Webinar

I wanted to find a webinar that fit the qualifications for the assignment, was going live this week, was free, and I would actually be interested in hearing the content or asking questions. I didn’t find anything in the provided links, so I went to Google to see what else I could use. I found a few that were interesting but not live this week, or that had just been live and offered the video of the content. I found one for this week about data analysis so I registered for that so at least I could complete the assignment. I wasn’t thrilled about the content, so I kept looking for webinars related to English at the high school level, gamification (I am studying in another class this week), and mass customized learning (which I am researching for another class).

13.png


I found one offered from ClassCraft which discusses language learning using the software, so I registered for that to learn more about ClassCraft and gamification, but it sounded more like foreign language learning and not ELA.

21.png

I finally found one from EdWeb that was about Digital Literacy, which I could definitely use in my classroom. I registered and looked through the directions and tech support videos such as advice for joining a live webinar.

31.png

They sent me reminder emails in the days and hours leading up to the webinar, and all I had to do to join was click a link. I approved the email and name listed, and I was in! It lasted one hour and I learned a great deal while also building knowledge with my co-attendees and the presenters.

4

Reflection on the Webinar Itself

The presentation had a lot of great strengths. I really enjoyed the content of the webinar in particular, including the variety of resources, ideas, quotes, and charts to help us follow along and understand. I also appreciated how it was easy to join and follow along. The presenter had slides on the screen, which were also available to download- see the slides HERE. We could hear her presentation clearly, and for most of the webinar we could also see her, which I liked more than just the audio alone. Another aspect of the webinar that I liked was how the viewers had a live chat feature, where we could ask and answer questions to the presenter and also to each other. Sometimes the presenter would ask a question, and we would supply ideas in the feed; other times we would ask each other questions and listeners could share ideas. There were so many people viewing (from all other the world!) that the feed could move too quickly at times, but if you scrolled up then it stayed in place so you had to time read. The comments only moved in real time when you scrolled down to the very bottom. HERE is the first 10 minutes of my time on the webinar to see the layout and comments.

There were not many weaknesses other than how the video of the presented cut out towards the end, and the comments when too quickly to follow at times. I might have been nice to be provided with more direct links to resources instead of just verbal descriptions of what kinds of things are available online. We teachers do not have an infinite amount of time to research, and sifting through hundreds of possible sites can be draining. If we had been provided links to a few good ones to get us started, that would’ve been helpful.

I really enjoyed this webinar, and the fact that it was free and all I had to do was click a button to listen to an interesting live presentation was amazing! If I can continue to find helpful webinars, I think it would be a great method to keep building my toolbox, stay current with educational ideas, and continue my own professional development. HERE is my certificate of completion, or see the snapshot below.

web.png

Using Webinars in the Classroom

In my own classroom, I could find webinars that my students could join and watch so they could send in their questions live to be answered, or I could make my own. I like how my students could see my presentation and hear my voice, while chatting on the side and adding their own thoughts and comments. I would need to find a good program to do this in, but to help my online students, provide additional help to students after school, or even just linking the recorded version of the webinar for students to watch later during class could be great resources for them. It would be awesome if my students could make their own broadcasts by preparing a presentation or speech and then performing it for a live audience. It alleviates some of the pressure of seeing your audience’s reactions in person while also sharing your ideas and getting immediate feedback. I could have them share webinars with people outside of our classroom, even during the school day. They could also create one as a topic assigned for class, and then we could just watch it during the time when we could watch their live presentation instead.

There are so many options to use this type of technology in the classroom, so finding the perfect resources and trying out assignments would be fun and helpful for students. It would probably take a little while for both myself and my students to learn the technology and protocol to make a successful webinar, but once I figured out how to give clear directions and create a good rubric, it would be fun!

This Show is Fire: My First Attempt at a Live Stream

I started exploring this process by exploring the sites available to livestream. The first four had substantial costs associated with them, and only offered a free trial run, usually for 30 days. After that point, I would have to pay to continue using the service. If I were actually going to livestream for my students, I would need to be able to do so for longer than 30 days, and I am not willing to pay for an account. I looked at LiveStream, uStream, Webex, Adobe Connect, Freedocast, Bambuser, and Iris, but they only offered free trials (see images below).  So, I kept looking.


BlogTalkRadio let me sign up for a free account with some limited features in comparison to the premium versions. I had to limit my post to less than 30 minutes, I could not stream during prime time, and I could only do audio by calling in and using a pin (I think? It was very confusing). I couldn’t see how to do video, only audio, so I decided that this was not the best provider for me.

8

I also then tried out Justin.tv for Twitch where I had to install Bebo in order to post videos, but I couldn’t install anything to my laptop because I don’t have administrative access to the school computer. Ultimately, I chose to do my livestream with Facebook live, because I have an account, it is free, and I already have over 1000 friends who would be notified when I began streaming. I could also use it to advertise for my segment through the day leading up to my post, and my friends could comment and see who else was watching.

If I were to use livestream with my students, I would either need to continue searching for resources, or I would create a professional Facebook account where students could see my posts and videos, and I could even have an album of book recommendations and other English-specific resources. Parents could see what we are working on, and if the account were public then I wouldn’t need to worry about befriending students or parents. Unfortunately, very few of my students actually use Facebook so I don’t know if that is a great option anyway.

YouTube Live is another good option because it is free, easy, and I already have a teacher YouTube account I could use. I tested a video with audio and it I think it was too

9

dark because the quality was just okay, and I didn’t hook up an external microphone so the audio was terrible. The process was very simple to go live and review the video, however.

Another idea is to use Skype, Googlehangouts, or Zoom and just have a list of all the student emails and send them all an invite when I want to create a type of live stream. I could share my thoughts live and they could join and respond or ask questions if they wish.

Preparing for the Live Stream

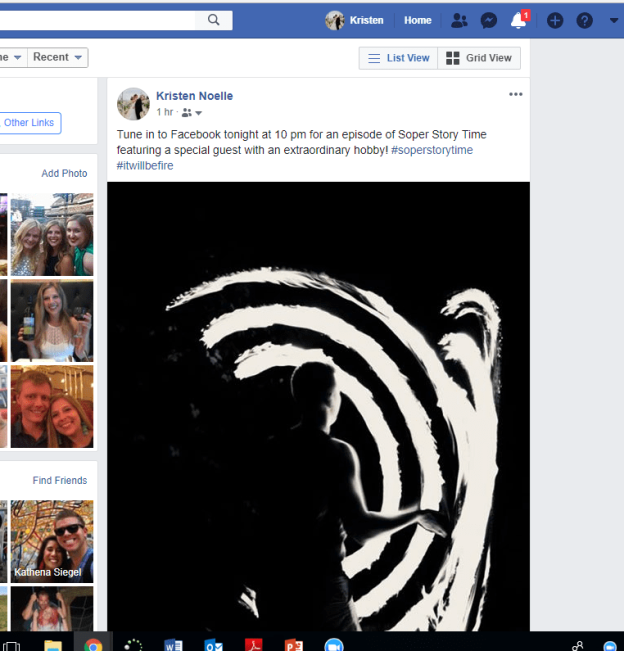
I had a hard time deciding what I wanted to stream about. I considered playing music, talking about education, doing a craft, cooking, hosting a wine pairing class, talking about books in my mom’s library, and ultimately chose to interview my husband and have him perform. He has many hobbies, but one of the most popular is his ability to perform poi, or spin fire. Many of our friends from college, his from high school, and our family members are familiar with his hobby and love to see him perform, so I thought that this would get a large audience and would also be more fun than me just talking by myself. My husband and I are busy every night this week, so we had to do a 10 pm broadcast which was later than I wanted, but fire poi is better in the dark anyway.

I wrote out a rough script for the show, came up with a name, and started to market it on my social media platforms.

10.png

I had to decide whether to record using my phone or my laptop, which my phone probably has better video and audio, but it is difficult to type onto while streaming and it is also hard to keep it steady while holding. I finally chose my cell phone and positioned a stand for the interview portion and another one for the performance portion of the stream.

When I was preparing for the livestream, the porch lights randomly didn’t work so I had to last minute relocate to my dining room. I also didn’t really try out any tests, because when you go live on Facebook, it notifies all of your friends that you are live, and if I did that before the actual show, they would be trained to ignore those notifications. You also can’t delete Facebook livestreams. When I recorded my livestream, I just hit the button that I wanted to go live, added a caption, and off we went. We started right at 10 and I interviewed my husband about how he was interested in poi and learned to perform. It was cool to see the comments, likes, and emojis pop up while people were watching, so we could know who was live with us. Then we went outside where Tom actually spun fire for the audience and my mom and I added some commentary. When he was done, we put out the fire and then I thanked everyone for watching and commenting and I thanked Tom for his time, and we ended the live broadcast. It went very well!

However, when we went to look at it, the video was sideways. Here is a link.

11

So I had a minor heart attack when I researched that you cannot change the orientation of a Facebook live video. I figured out how to download the entire 11 minute video, put it into Movie Maker, changed the orientation, save it as a movie file, upload that to Facebook, and then link and post the correct video separately and embedded within the sideways live version. It is interesting that no one thought to let us know that the video was sideways during the live filming, and we had 100 views as we ended the live stream. My mother-in-law even shared the sideways video, and not the correct orientation one I posted right afterwards. Right now, the morning after the livestream, we have 17 likes, 34 comments, and 264 views on the sideways video.

Here is the correct video I posted afterwards and linked in my original post. It currently has 6 comments, 12 likes, and 182 views.

12

So I had a few glitches for my first attempt at a livestream, and it was a little nerve-wracking to have a specific start time and market my event so much where I know of a good amount of people specifically planning to watch. The quality of the audio was good but the video was just okay. In the future, I would consider using my laptop and a microphone, although I think my laptop video is about the same. It is good to try it though and compare so you know for sure. It was fun to have so much feedback, comments, and even today, people are still reaching out to meet up after seeing that I live back in my hometown when I mentioned it in the video.

In terms of using livestream for education, I could see offering a livestream as an option for an assignment instead of say a speech to the class. The students would need to plan the time and market it, and prove that they had at least 4 viewers to get full credit. They could use YouTube live or anything easy, but they might find speaking to their phones or laptops easier than doing a speech for the class.

I could also see myself hosting a livestream every so often throughout the semester to answer questions before a big project or test so students can chime in and talk about their difficulties and thoughts in real time.

Broadcasting yourself live is powerful, and there are a lot of cool ways teachers can use it in education. If I did use it, I would have to talk to my students about being careful of what you say live, and what is in the background so they don’t get themselves in trouble on purpose or even by accident. After they tried it once, they may want to do it more in the future and feel more comfortable talking to big groups, which is definitely great learning opportunity for an English class.

#Sopersnaps as Food for Thought

I decided to take part in the photo-a-day challenge this week. I used the hashtag #sopersnaps and also #lookforthegood, which was my theme for the week. You can see the images I posted by following this link from Instagram, or below. I used my Instagram account to post the images every day. The first few days, I had a lot of ideas about what I wanted to post online for the assignment, but when I got busier later in the week, it became much harder. I would actually start to stress out when it was late in the day and I had no idea what to post yet. I was at a restaurant on Friday, playing around with different angles of the lights for my post, when a stranger came up to me and started giving me advice about camera angles, lighting, textures, and he showed me some of his own informal pictures. I learned a lot that night and throughout the week overall!

I was trying to post images that were interesting, different from each other, pleasing to look at, and not too person-specific (no selfies, etc). The assignment forced me to be more aware of the beauty around me throughout the week, and what I wanted to remember and share with the world.

day onesconesfountainIMG_8347IMG_8422IMG_8476IMG_8673

If I were to incorporate more images or use of social media for a similar assignment with my own students, I think it could help them to express their creative sides while learning more about photography and even social media. While students could learn about social media through the process, many of them would already feel very comfortable using it as a tool for an assignment. For example, one study by the National School Board Association shows that, “Nearly one in four (24 percent) of online students say they post photos or artwork created by others at least once a week. More than one in five (22 percent) say they post photos or artwork of their own creation at least that often” (National School Boards Association, n.d.). So they would not need to learn a great many new skills to work on posting pictures and using hashtags. Not only would they be comfortable with the act itself, but this type of assignment would help them learn in new ways. Another article discusses how: “Presenting different drawings & pictures supports the clarification of ideas & communication of information” (Aloraini, 2012). They would need to focus on what they were trying to say with their posts, both figuratively and literally, and how they could best express their messages with their audience.

This assignment was fun for me to accomplish while pushing me to think consistently about it and pictures in general throughout the week. Students already familiar with social media would have a similar experience, and students not familiar with them could learn how to connect with others and help the rest of the world see things from their own point of view. Especially in an English class, where we focus primarily on the written word, students would benefit from pairing images with their text in powerful ways.


References:

Aloraini, S. (2012, May 26). The impact of using multimedia on students’

academic achievement in the College of Education at King Saud University. Retrieved from https://www.sciencedirect.com/science/article/pii/S2210831912000033?via=ihub

National School Boards Association. (n.d.) Creating & connecting:

Research and guidelines on online social and educational networking. Retrieved from https://cdn-files.nsba.org/s3fs-public/reports/CREATING-CONNECTING-Research-and-Guidelines-on-Online-Social-and-Educational-Networking.pdf?uWboUuaGF3I1xHt6.Vlnq4D9HnfutHyF

Using a Back Channel to Give Students a Voice

Using Social Networking in Schools

group hand fist bump
Photo by rawpixel.com on Pexels.com

Students often feel more comfortable sharing their ideas online than they do in person. When trying different kinds of discussions, online discussions typically allow the greatest number of students to participate. So, trying to use a back channel in the classroom can allow students who otherwise may not do so, to share ideas and questions about the class. This type of social media site is “a private back channel that can be used as a collaborative means for discussing and documenting classroom interactions” (Dembo and Bellow, 2013, p. 95). Teachers should harness the power of social networking sites to engage students in the classrooms, because they already use them outside of school. One student notes that: “Among teens, that amounts to about 9 hours a week on social networking activities, compared to about 10 hours a week watching TV” (National School Boards Association, n.d.). Students are more and more regularly spending time on social networking sites to talk about what is on their mind, build individual profiles, and create and share content. The same study also notes that “[m]ore than one in five online students (21 percent) say they post comments on message boards every day; four out of 10 (41 percent) say they do so at least once a week,” so students enjoy talking online.

The Benefits of Social Networking

With that statistic in mind, it makes sense to use online discussions such as a backchannel in the classroom. For example, one student, Justin Lansink says in the article “Speaking Up in Class, Silently, Using Social Media,” “When you type something down, it’s a lot easier to say what I feel” (Gabriel, 2011).  If a back channel allows a student to share their opinions and have their voice heard who otherwise would be silent, it is worth considering.

abstract art blur bright
Photo by Pixabay on Pexels.com

Another reason to use a back channel is that it allows the teacher to model and monitor proper netiquette online. Many parents, teachers, and administrators fear that students partake in too many negative interactions online, so by using a back channel as a teachable moment, students will get into the habit of treating others with respect online as well. One study notes that, “Many log on daily to their social network pages and these have become spaces where much of the social activity of teen life is echoed and amplified—in both good and bad ways” (Lenhart, Madden, Smith, Purcell, Zickuhr, and Rainie, 2011, p. 1) so it is important to help students be a part of the good side of the internet. The same study records that, “44% say they saw such [cruel] behavior ‘only once in a while’” (Lenhart, Madden, Smith, Purcell, Zickuhr, and Rainie, 2011, p. 1). So even though cruel behavior may not actually happen as often as we assume, it is still important to teach students about how to talk online.

Making a Back Channel

I first explored Today’s Meet to make a back channel for some of my lessons, but I got this message:

today

Then I googled back channel websites and came across Chatzy. There are many other sites to play around with and see what works for you and your students, but I liked the privacy and administrator options in Chatzy. One way I would use a back channel this fall when I teach American Literature to 11th graders, is to use it for a discussion when we watch the movie version of The Crucible towards the beginning of the semester. After reading each act, we watch the act in movie form to see the artistic choices and characterization on film. The back channel would allow us to talk about these choices during the movie while also considering the plot and characters overall in the play. I start the conversation with, “As we watch The Crucible, here are two questions for you to reflect on and discuss. 1) How is the movie different from the play? How is it a different experience for you? 2) Should John Proctor be admired or condemned?” But I can post additional questions throughout the lesson. Here is the Back channel for The Crucible I set up with Chatzy.

chat

Students would be expected to post at least one answer to a question, and at least one response to another student’s answers. They could additionally pose their own questions and just share their thoughts about the video. The objectives for this activity would be for students to analyze the text in a different medium, and compare the play to the movie using specific details from one or both sources. I would grade this based on a completion grade such as 0/10 for not answering or responding, 5/10 for doing one or the other, and 10/10 for doing both. This would help the students stay engaged during the movie, especially if I paused it at interesting parts and asked them to post a thought, question, answer, etc before I continued playing the video.

Another idea for a back channel is to create one during a lesson where students are moving around to learning centers or stations, but you want to maintain a consistent dialogue with the class. For American Literature, we begin the semester with Native American stories, Immigration tales, and instances where culture clashes. During my lesson on the clash of cultures based on immigration, I have a station with a nonfiction article about “Culture and Conflict,” for them to compare the Sherman Alexie’s, “The Absolutely True Story of a Part-time Indian,” a station about biological warfare, a station to read “Of Plymouth Plantation,” and a station to watch a video about the history of this time period.  I could have a back channel going throughout the class for students to answer questions about culture, immigration, and share their own questions and thoughts on the topics.

Using these ideas for back channels will help students engage better with the material while collaborating with their peers and speaking politely online.


References

Dembo, S., & Bellow, A. (2013). Untangling the Web. Thousand Oaks, CA: Corwin.

Gabriel, T. (2011, May 12). Speaking Up in Class, Silently, Using Social Media. Retrieved from https://www.nytimes.com/2011/05/13/education/13social.html?pagewanted=all

Lenhart, A., Madden, M., Smith, A., Purcell, K., Zickuhr, K., & Rainie, L. (2011, November 09). Teens, kindness and cruelty on social network sites. Retrieved from http://www.pewinternet.org/2011/11/09/teens-kindness-and-cruelty-on-social-network-sites/

National School Boards Association. (n.d.) Creating & connecting: Research and guidelines on online social and educational networking. Retrieved from https://cdn-files.nsba.org/s3fs-public/reports/CREATING-CONNECTING-Research-and-Guidelines-on-Online-Social-and-Educational-Networking.pdf?uWboUuaGF3I1xHt6.Vlnq4D9HnfutHyF

Social Studies Gets Social: Interview about Mobile Phones

Introduction

Dayna Walger has been teaching social studies in Virginia for the last 11 years. She is currently a gifted specialist and resource teacher for Colonial Heights Public Schools, and three years ago was teacher of the year. I sat down with her to listen to her experiences with using mobile phones in the classroom. She has used phones for mostly games and projects, and had good engagement with her students. The worst situation was one student’s phone was broken, so she thinks that key to using phones is having a strict and consistent protocol between all teachers and throughout the year. Now that her school has Chromebooks, she prefers to use those.

access adult blur business
Photo by Pixabay on Pexels.com

Interview – Click HERE for the Video Interview!

  1. Describe how you used mobile devices in your classroom.
    1. I have used mobile devices a few different ways in the classroom.  I have used them for online learning review games such as Kahoot or quizzes.  Students have also used mobile devices to record and upload pictures or videos for PBL projects.  
  2. What challenges did you have to work through to make that happen? For example, did you have to get parent and administration approval?
    1. Before students were given Chromebooks, we would sent out a permission slip written by the school that explained when cell phones were allowed to be used.  The letter stated that the phones were only allowed when a teacher was using them for instructional purpose. The phones could only be used as stated by the teacher.  When students were done, phones were to be turned off and in the locker. This policy was also in the student handbook.
  3. How did using mobile phones increase engagement and student learning?
    1. Cell phones helped to engage students because students could work in teams or even one to one on response system games such as Kahoot.  Students could also collaborate on projects to create videos and upload them to google classroom.
  4. What would you do differently in the future? What did you learn through this experience?
    1. As long as students were aware of when and how they could use the cell phones, there was relatively no problems with this practice.  There was one student who broke his cell phone. I prefer if students are given a Chromebook purchased by the school but if this is not available, cell phones are a great alternative.
  5. Do you think administrators should encourage teachers to use phones in schools?
    1. If there are no Chromebooks or other computers available for students, the use of cell phones should be encouraged.  The district should make sure to have the policy for cell phones in a student handbook that parents and students need to sign and agree to.
  6. Should more teachers work to incorporate mobile phones?
    1. Yes, as long as the cell phone policy is written out and the policy is followed

Reflection

With her middle schoolers, Mrs. Walger has found success with mobile devices with her students, especially in terms of engagement. It sounds like the students enjoy using their phones, and they are easier to use than logging into computers. When introducing a short game, they worked well for her classroom. I never considered the fact that students could break each other’s phones. When they use their laptops and they get broken, the school will send an invoice home but they will fix it themselves right away. For a phone, the parents would need to figure it out on their own and may be frustrated. Students would need to know up front that they are using their phones at their own responsibility.

She noted that she only used them until she got her Chromebooks, so I wonder if she found the Chromebooks to do pretty much the same tasks as the cell phones but in a more professional fashion. That is how I often felt in my own classroom as well. I think it may be fun to use phones for certain games or offer it as an alternative on a big project, but otherwise in a 1:1 school, I still think laptops are the most powerful tool for students.

Cellphones as Tools for Creation

access adult blur businessMy school district as a general rule that students should not have their phones out during class, other than by teacher discretion. They may have them in the hallways or during lunch, but they are fronted upon during class. My school is 1:1, and I have extension cords all around the room to make sure that my students have constant access to their laptops. For the past two years, my 9th graders have been provided with touchscreen laptops that are portable, the screens bend all the way down so you can use it like a tablet, and they are reasonably fast and reliable. With all that in mind, I didn’t see cell phones as being necessary or even wanted in my classroom. The looming desire of snapchatting seemed too present in my students’ minds regardless.

However, today I made this digital story about becoming a teacher based on my life entirely on my cell phone, which is a similar style phone must of my students already own or have access to. It took me less time than it did to make my original video in Adobe Spark, but I was also already familiar with the program which does make a difference.

Last semester, I used Adobe Spark to task my students with creating a Public Service Announcement  based on one of the two literature circle books they read during the previous few weeks in class. They had to determine a theme from the novel, and then create the video supporting that theme with evidence from the novel itself, other books or movies, and the news. They got excited about the project (although not excited about recording narration), and while there were some glitches with saving and accessing the program, it went smoothly overall. Offering them the ability to find images, record video and narration, and put it all together in the Adobe Spark app like I did today might make it even more smooth.

While I’m not sure I am in a place where I would feel comfortable mandating that all of my students use their phones for a similar project, I could offer it as an option to students who feel frustrated with their laptops and prefer to work on their phones. They would appreciate the flexibility and choice, and I know that phones can do the job just as well as our laptops can.

Evaluating Online Resources for Education

I looked at Richard Byrne’s blog first, since I also had to learn about him and his blog for another course this week. Then I glanced through Kathy Schrock’s tech tool guide and found the layout so much more easy to manage. The tools are listed, linked, and categorized. A little description of each one would help me choose where to begin, but the layout is easy to search through quickly. I searched for Web 2.0 tools that would allow my students to create assignments and projects in a fairly short amount of time. I already have several large projects built into my 9th grade course, but I could include many smaller ones throughout a unit which would allow them to be more creative and visual with their learning and writing.

  1. Pixteller – I first clicked on Pixteller which is a site that allows you to create posters, ads, cards, and more. I liked how you can create an accounting using your Google account, which made signing in simple. It would be easy for students to create accounts and navigate, and the site itself is clean and visually appealing.
    1. I played around with designing a card, and since I started my design using a pre-existing template, had a rough draft done in minutes. The options are clearly laid out for choices in what types of projects to make, what templates are available to begin, and what your options are for editing and designing your project.
    2. One way I could use this site with my students is to have them design cards for characters of a book from another character’s point of view. In the screen shot, I began a design for Daisy from Jay Gatsby on her birthday based on The Great Gatsby. I would also ask the students to include a back or second page of their card with a longer note for the character.
    3. Another idea would be to have students create an ad for their persuasive argument which introduces their topic and adds a mood for their persuasive speeches. The ad would be in the background during the speech, or at least on a first slide of a presentation. pix
  2. MindMaps– My students do a fair amount of writing (essays and shorter forms of writing) so a virtual tool to help them brainstorm and plan out their work would be helpful, especially for my visual students. MindMaps was cool in that I did not have to make an account at all, and I could get right to creating. The text boxes are easy to type into, and the offshoots are simply to create, move, and even copy and paste. I found the saving feature in MindMaps and to my computer easy, but I kept wanting to save them right into my Googledrive instead. I emailed the developers with my question about saving, the ability to collaborate, and to use a mindmap as a template or worksheet for students.
    1. You could ask students to create a Mindmap as a brainstorming technique before an essay, with a minimum number of topics relating to their main topic choice.
    2. You could assign students a theme or controversial idea and ask them to create a mindmap of support from a text, or pro and con ideas about the controversy. mind
  3. WeVideo– I wanted to look into Capzles, which Dembo and Bellow describe as, “a refreshingly unique take on timeline creation that goes far beyond what you may have seen previously” (2013, p. 154), but I couldn’t even get the website to load, so then I went to play around with Pixton but I couldn’t actually find it in my copy of Untangling the Web. I must have an old version (it’s 2013) or something. I even signed into the eBook version to look for it and StoryboardThat but didn’t see them. uJam I couldn’t imagine using with my students, ClassDojo I am familiar with and know I won’t use, and Padlet and Easel.ly I have already used with my students. Upon an initial inquiry, WeVideo seems to be primarily useful as a paid application. Logging in and creating an account was not too bad once I realized it was possible to get a free account. I started making a video right away, and I like the multiple lines of media components which is easier to navigate than MovieMaker. I also like how you can record audio and upload your own images and videos fairly easily. I kept trying to include elements from the paid version, and WeVideo was quick to note when I did and ask me if I want to upgrade. I wish the free version only showed you the elements available to you, since I can’t imagine my school paying for an account for all students and teachers. I didn’t watch as many tutorials as I really should have, so although it didn’t take me too long to begin a little video, I felt slightly frustrated with the application. Storyboard mode seems like it would be helpful, and I believe that you can collaborate on videos with others which would be great. However, I like MovieMaker which all my students have and know how to use, and I also started using Adobe Spark for really short, easy videos such as public service announcements this past year. Here is the short Transcendentalism Video I made when I played around with this resource.
    1. One idea for using this resource with students would be to have them create a video on an author or time period and then use those as openers for a unit. The students would need to do their own research, plan out their video and collect the resources, and then put it all together with recorded audio.
    2. Another idea is that I could use WeVideo to create an introduction to a unit by including initial questions, images, and thoughts to get my students into the topics. we

Three Tools, Infinite Options

Listed below are three tools that I played around with this week to determine how I could use them personally as well as in my classroom. I tried Bit.ly for a url shortener, Deliv.r to create QR codes, and the bookmarklet The Printlimintator to clean up articles for printing. Read my thoughts on these tools and how you could use them below! Comment if you have any experience with these, or if there is something similar you like better!

URL shortening: Bit.ly

  • Results- I found Bit.ly overall to be a great, easy tool. I first plugged in my blog for Wilkes, kristensoperblog.wordpress.com and it was shorted to https://bit.ly/2KRdVEV. That didn’t seem to be more memorable, so I tried a Padlet board (which you can change the url in Padlet, I know, but I was just experimenting) which went from https://padlet.com/kristen_barnett/k0cn6chdrc9e to https://bit.ly/2lUBtOg which was nicer, and then I could edit it to read bit.ly/artinnight which was the best yet. I also made one for a MLA format citation creator that my students like to use, but never remember where to find it. I shorted that url to http://bit.ly/citationcreator which is helpful!
  • Personal Use- Sending my sisters or mom to websites in person or in text would be simpler, especially if we are planning a party and want to reference a few specific websites over and over. I could personalize the bit.ly urls for that specific party and maybe even number the sites so we could remember four or five bit.ly’s at once. I could use this to share links to educational articles or resources that I want teachers in my department or on my team to check out. If I don’t want to email the link, or I just want it to be memorable, the url shortener will help.
  • Professional Use- Even though I link everything we do to a vitual online agenda, sometimes students want to use a source that I did not go over on that exact day, and then they have to try to search for it in the previous agendas or my Canvas course. Having a few of our most useful websites written down on a side board via their shortened urls would help the students to find what they want fast. Wasting time in class and trying to find resources can be frustrating, but this would help.


QR Codes:  Deliv.r

  • Results- r was easy to sign up for, and after searching around for how to begin making QR codes for a minute, I figured out the process. The free version does not include many extra features, and the settings of the simple QR codes are little confusing, but if you literally only want to create black and white QR codes that link to a website, it is quick and easy.
  • Personal Use- I created two QR codes in just a moment in preparation for my planned evening today. My husband and I moved in with my parents last week during a transition to his new job until we find our own house in a new location. With all the hassle of moving, setting up a storage facility, reorganizing our possessions, and learning to coexist, we wanted to thank my parents for all their efforts. We are serving shrimp dish for dinner, pictured below, and since my parents both love cooking and finding good recipes, I created a QR code that links to the blog I found the recipe from. IMG_7987
  • Then, my husband and I will try out a new song we have been working on for guitar and cello, and I made a QR code that links to the official music video for information on the song, band, and lyrics. Other ideas for QR codes in my personal life would be to create them for a party that has different stations or pairings, so that as guests mingle, they could learn more about the culture of a dish, or the history of an interesting song. IMG_7988
  • Professional Use- In the classroom, there are tons of ways to use QR codes. Lately, less and less of my students have a QR code reader app downloaded to their phones, so accessing them can be a hassle (although I think many phones allow you to just take a picture and it automatically loads the link). In the past, I have created a webquest-style gallery walk as a background activity to a novel unit. I linked historical information, famous images, and videos through QR codes to station numbers, other images, and questions. The students would write down their guesses to questions, and then the actual answer based on the QR code link. Another cool use I have seen is in an art gallery in my school. When the students presented their final projects via a gallery in the main entrance way, they also had to create a video or write a paper explaining their creative choices. They discussed their inspirations, methods, and challenges in the process. The students then submitted the link to their video or paper into a QR code that was physically posted by their piece of art and name. When you went to the gallery, you could scan the QR codes to hear the artist’s rationale.


Bookmarklets: Printliminator

  • Results- Dragging the bookmarklet to my Chrome dashboard took only a moment, and I didn’t have to create an account to start using. You just click on the titles and images that you do not want to include in a printed form, and the bookmarklet gets rid of them, leaving your article or whatever resource you are trying to print in a clean and easy to read layout.
  • Personal Use- In my personal life, I could clean up recipes, articles, instructions, or anything else I want to use with my family and friends that otherwise may be littered with ads and suggestions to other articles.
  • Professional Use- The best application for this bookmarklet is to clean up articles and stories that I want my students to read. Printing out articles or short stories with too many ads and other distractions makes reading the article difficult, especially for students who have a hard time focusing anyway. By removing the distractions, the students can focus on the article in peace while also having room to add annotations.

    imaage
    A screen shot of the original article which I asked my 9th graders to read this spring.
imaggge
The same article, cleaned up with The Printliminator to get rid of the ‘white noise’ around the article.

Three Suggestions for Web 2.0 Tools

With so many new online resources being introduced every day, it can be hard to know even where to begin to delve into exploring them. Here are three online resources that seem promising for use in the classroom. If you have experience with any of these tools, please comment and let me know what you think! I have never used them in my own classroom.

Social Site: Edmodo 

  • Site Evaluation-
    • Edmodo is a learning management system that is easy to set up and share with students. Logging in, creating assignments, and managing folders and information is simple. The site is free to use, and students need only their school computers to access it. The layout is clear and while only a few options appear when you first log in, each option leads to more which can be personalized and changed.
  • Use for Student Learning-
    • Edmodo can be used to assign and assess quizzes and assignments, survey the class based on formative assessment, create groups for students to collaborate it, and much more. The company’s COO, Crystal Hutter said in 2013 that, “We see our opportunity as being able to connect teachers and classrooms around the world to create a powerful network of learners so that all of the best ideas and resources can surface.” Edmodo helps students to connect to each other, their teachers, and other teachers to be able to connect to great resources. Social interaction online is becoming more and more important, and students deserve a place to collaborate online for their classes where they can build relationships and learn proper online etiquette.
  • How Others are Using it-
    • Many teachers use Edmodo for many classroom assignments, and students are simply trained to go there to access information, directions, links, and submit their work. Ben Wilkoff wrote back in 2010 that he uses Edmodo with his online and brick and mortar students to create a weekly news show, music videos, literary discussions, and teach each other how to use technology. I can only imagine what he uses it for 8 years later. He adds, “I can honestly say that I didn’t know a group of students from all ages would coexist in such an open space and work together to create things of learning and beauty all because they had the tool and the opportunity to do so.”
    • Dembo and Bellow, in Untangling the Web, suggest using Edmodo to create a profile for a real or even fictional person as an assignment. The profiles can interact and students and read and comment on each others’ work (2013, p. 114-115).


Creative Site: VoiceThread

  • Site Evaluation-
    • VoiceThread allows users to share images and create videos based on images, text, audio, and video. Viewers can comment in text, video, or audio to provide feedback. The site is easy to use, with few options getting confusing or frustrating, it is free, and the finished products can be shared and viewed easily.
  • Use for Student Learning-
    • Students can use VoiceThread to make their own videos sharing their opinions on works, sharing original creations, presenting research, and synthesizing topics. They can also view VoiceThreads made by teachers for a flipped classroom approach, and view other students’ videos to learn and comment on them.
  • How Others are Using it-
    • According to New Literacies Essentials, some examples of how to use VoiceThread to build literacy are to record students reading at home to parents, have students create videos explaining the writing process, share photos from different regions and explain and ask questions about them, and introduce the setting of a novel (n.d.).
    • Christie DeCarolis from Rutgers University discusses using VoiceThread for a general class discussion that the teacher posts, group presentations, and narrated lectures (2015).
    • In Untanging the Web, Dembo and Bellows describe using VoiceThread for annotated journaling where students must explain their choices in writing based on screenshots of the work (2013, p. 80).


Curation Site: EduClipper 

  • Site Evaluation-
    • According Adam Bellows, the founder and CEO of Educlipper, this site “is a platform designed specifically for teachers and students that… allows you and your students to find, collect, and share web content quickly” (2013, p. 17). This curation tools allows both teachers and students to ‘clip’ or save websites and articles to boards, and then share those boards with others. They layout is easy to manage since the site shows visual clips of the saved sources along with titles and descriptions so you can remember what you saved each tool for. Creating a bookmark allows you to ‘Educlip It’ whenever you find a tool you want to save.
  • Use for Student Learning-
    • This tool is probably strongest for allowing teachers to collect, collaborate on, and share sources for use in the classroom. Teachers can also create boards to share with students as an introduction to a unit, an online scavenger hunt, a research tool box, and much more. However, teachers could assign students, either individually or in groups, to create their own boards to work on a project as a group, find background for a topic in class, or even make an art gallery or playlist.
  • How Others are Using it-
    • Laure Ascione wrote in 2014 that, “eduClipper is born out of the educational need for teachers and students to have a better platform to explore, share, and contribute resources and materials to help enhance teaching and learning of both a formal and personal nature.” In terms of use in schools, Ascione notes that one powerful feature is ability to collaborate on a clipboard so that teachers can differentiate instruction by sending resources to particular teachers or students. She also notes that teachers can create classes and class portfolios to track work through the year. Teachers can also use clipboards in for virtual classrooms and other dynamic assignments.
    • In Untangling the Web, one idea for classroom use is to assignment students to become eduExperts by finding the best resources on any assigned topic in order to share them with students from a lower grade (2013, p. 20).


References

Build learning networks with eduClipper. (2014, September 23). Retrieved from https://www.eschoolnews.com/2014/09/24/sotw-educlipper-clip-983/

Conway, P. (2017, August 31). EduClipper. Retrieved from https://www.commonsense.org/education/website/educlipper

Edmodo. (n.d.). Retrieved from https://www.edmodo.com/home

Edmodo Platform Transforms Learning. (n.d.). Retrieved from http://www.educationworld.com/a_curr/rubin/edmodo-platform-transforms-learning.shtml

Educlipper. (2013, August 25). What Teachers and Students Need to Know about Educlipper. Retrieved from https://www.educatorstechnology.com/2013/08/what-teachers-and-students-need-to-know.html

Examples of VoiceThreads for Education – New Literacies Essentials. (n.d.). Retrieved from https://sites.google.com/site/voicethreadliteracyessentials/home/voicethread-basics/examples-of-voicethreads-for-education

Instructional Design & Technology. (n.d.). Retrieved from https://idt.camden.rutgers.edu/2014/11/06/voicethread-overview-examples/

Teacher Testimonial: Why Our Students Love Edmodo. (2010, August 31). Retrieved from https://blog.edmodo.com/2010/08/31/teacher-testimonial-why-our-students-love-edmodo/

Teaching History.org, home of the National History Education Clearinghouse. (n.d.). Retrieved from http://teachinghistory.org/digital-classroom/tech-for-teachers/21844

Tools. (n.d.). Retrieved from https://educlipper.net/tools.html

VoiceThread – Home. (n.d.). Retrieved from https://voicethread.com/myvoice/